“This shop is part of a social shopper marketing insight campaign with Pollinate Media Group® and Fruttare, but all my opinions are my own. #itsallgood #pmedia http://my-disclosur.es/OBsstV”
I have a super yummy, frozen treat to share with you today. It's pretty much amazing and absolutely the easiest thing to make...ever. It would be such a fun activity for kids because you can make each one different. Here's how to make these amazing chocolate covered frozen fruit bars.
The best part about this "recipe" is that you can totally cheat by using store bought fruit bars. Of course you could make your own, but who has time for that? I stopped by Price Chopper and grabbed these Fruttare Bars (but they are available at most stores nationwide). I got Mango and the berry and milk variety. Any fruity frozen bars will work, but these are so yummy. It's the first time I've tried them and they are so natural and fresh tasting.
You will also need chocolate chips (I got dark chocolate because that's how I roll) and toppings. I chose sea salt, coconut, sprinkles and nuts. But you could go crazy with mini m & m's, crushed up cookies, white chocolate, really anything your heart desires.
First, you want to melt your chocolate chips. I just do mine in the microwave and stir every 30 seconds until melted.
Next, you will dip your fruit bars. I actually just kind of spooned the chocolate over the bars until evenly coated.
Once that is done, quickly sprinkle on your toppings. This is where little hands love to help.
sprinkles.
coconut.
sea salt.
and a little bit of everything.
Set your bars on a parchment paper lined cookie sheet and freeze until the chocolate is fully hardened. This will only take a few minutes. Any leftover bars can be stored in a ziplock baggie in the freezer.
They are so cheerful!
And once that chocolate hardens, it forms a nice shell to bite into. Yum.
Go make this yummy summer treat today!
To learn more about Fruttare, visit their Facebook page.
Chocolate Covered Frozen Fruit Bars
Monday, June 30, 2014
Sunday, June 29, 2014
Wedding season is upon us! I don't know about you, but we are invited to five wedding this summer! Although, that doesn't even come close to the "summer of weddings" that we experienced the same summer we got married. I think we were invited to 12 just that summer. Even if you just have one wedding to attend, I have a quick little gift wrap idea for you PLUS some gift ideas from Target!
For my gift idea, I made a garland of map hearts and wrapped it around simple white gift wrap. First, I cut my hearts out of some old maps I already had on hand.
Then, I simply stitched them together on the sewing machine. Easy!
Wrap them around a gift and you are good to go. They can be hung as a sweet little garland later!
And now for my gift guide. This one is coffee-themed. I thought these elements would create a fun and personalized gift.
1. Nespresso Machine
2. Threshold Floral Tray
3. Ceramic Creamer
4. Ceramic Sugar Bowl
5. Chalkboard Canister
6. 13 Piece Espresso Set
Content and/or other value provided by our partner, Target. All opinions are my own. #TargetWedding #Sponsored
For my gift idea, I made a garland of map hearts and wrapped it around simple white gift wrap. First, I cut my hearts out of some old maps I already had on hand.
Then, I simply stitched them together on the sewing machine. Easy!
Wrap them around a gift and you are good to go. They can be hung as a sweet little garland later!
And now for my gift guide. This one is coffee-themed. I thought these elements would create a fun and personalized gift.
1. Nespresso Machine
2. Threshold Floral Tray
3. Ceramic Creamer
4. Ceramic Sugar Bowl
5. Chalkboard Canister
6. 13 Piece Espresso Set
Content and/or other value provided by our partner, Target. All opinions are my own. #TargetWedding #Sponsored
Tuesday, May 27, 2014
“This shop is part of a social shopper marketing insight campaign with Pollinate Media Group® and Rubbermaid, but all my opinions are my own. #pmedia #RMDishRack http://my-disclosur.es/OBsstV”
I don't know about you, but I feel like my kitchen sink is always an ongoing battle. Even when the dishwasher is fully loaded and running, there are still the pots and pans and other fragile dishware sitting in the sink. I'm usually too lazy to wash them right away, so they just sit there. It hit me the other day that I should just invest in a countertop dish rack and reorganize things to set me up for success. Duh! After doing this, I feel like the kitchen sink is now a happy place!
First, I headed to Target and used a 15% off Cartwheel coupon to score this heavy duty Rubbermaid Dish Rack to help with my sink clutter battle.
This was my sink. It deceivingly looks somewhat clean...
But the overspill of dishes that didn't fit in the dishwasher and fragile things are always lurking.
I had rigged up this cake stand to hold my soaps and sponges (they were living in the flower pot), but it just always seemed nasty and dingy.
The dish soap holder lost it's top and then just looked like this always. Yuck.
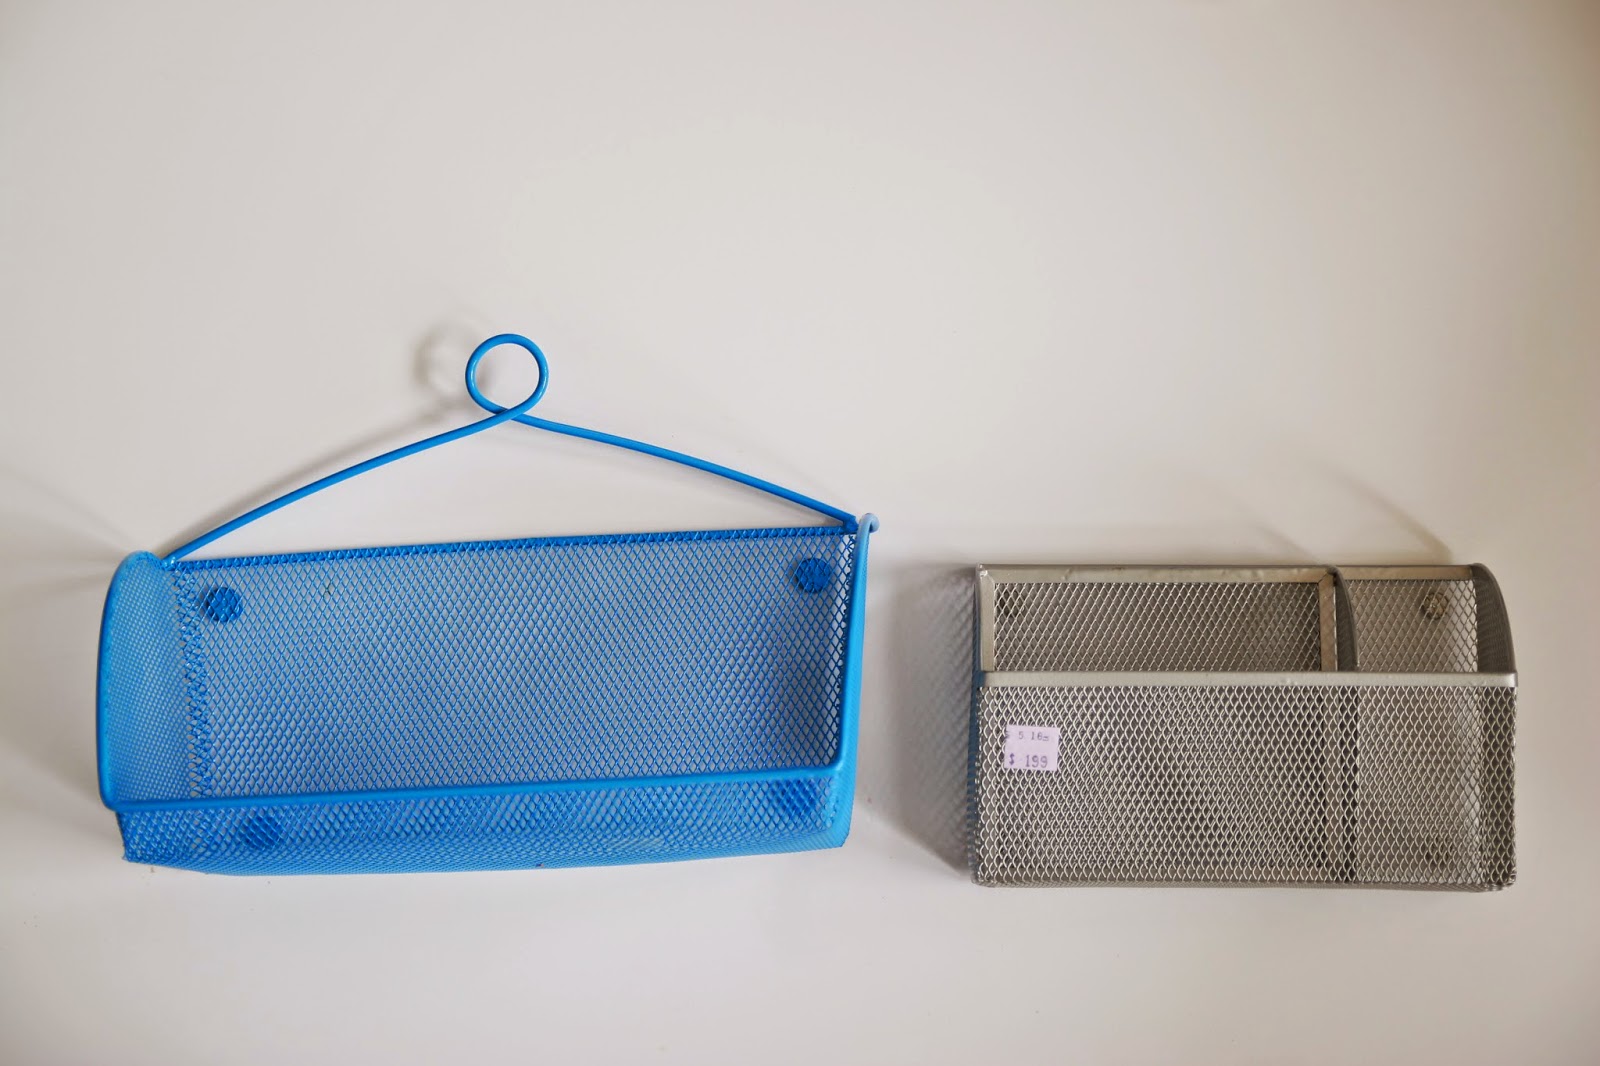
So, like any good DIY-er and thrifty girl, I headed to the thrift store to see if I could come up with an easy solution. I immediately spotted these office supply organizers and I knew they had potential.
I invisioned my empty nook right here....
And so after a little oil rubbed bronze spray paint,
That little nook was transformed into this:
The pencil/paper holder was the absolute perfect size for holding sponges!! And the small shelf fit a nice new shiny glass dish soap holder, a tiny dish for the scrubber and a new friendly succulent.
That pot with the nasty sponges also acquired a new friend for the kitchen
And now my pots and pans and too-big-for-the-dishwasher stuff can hang out in the Rubbermaid Dish Rack, which really does get the job done! (Why was I wasting my time with hand drying? Just stick those wet suckers on this rack and it does all the work.)
Yay! Just a few small changes makes this space fresh and happy!
I don't know about you, but I feel like my kitchen sink is always an ongoing battle. Even when the dishwasher is fully loaded and running, there are still the pots and pans and other fragile dishware sitting in the sink. I'm usually too lazy to wash them right away, so they just sit there. It hit me the other day that I should just invest in a countertop dish rack and reorganize things to set me up for success. Duh! After doing this, I feel like the kitchen sink is now a happy place!
First, I headed to Target and used a 15% off Cartwheel coupon to score this heavy duty Rubbermaid Dish Rack to help with my sink clutter battle.
This was my sink. It deceivingly looks somewhat clean...
But the overspill of dishes that didn't fit in the dishwasher and fragile things are always lurking.
I had rigged up this cake stand to hold my soaps and sponges (they were living in the flower pot), but it just always seemed nasty and dingy.
The dish soap holder lost it's top and then just looked like this always. Yuck.
So, like any good DIY-er and thrifty girl, I headed to the thrift store to see if I could come up with an easy solution. I immediately spotted these office supply organizers and I knew they had potential.
I invisioned my empty nook right here....
And so after a little oil rubbed bronze spray paint,
That little nook was transformed into this:
The pencil/paper holder was the absolute perfect size for holding sponges!! And the small shelf fit a nice new shiny glass dish soap holder, a tiny dish for the scrubber and a new friendly succulent.
That pot with the nasty sponges also acquired a new friend for the kitchen
And now my pots and pans and too-big-for-the-dishwasher stuff can hang out in the Rubbermaid Dish Rack, which really does get the job done! (Why was I wasting my time with hand drying? Just stick those wet suckers on this rack and it does all the work.)
Yay! Just a few small changes makes this space fresh and happy!
Sunday, May 4, 2014
I recently created a fun stenciled pillow for the girls' bedroom using I Love To Create’s Tulip For Your Home stencil kit. This line of stencils and paints are so cute and it was the easiest thing to make. I think the project took me 10 minutes total!
These are the supplies I used:
Step 1: Put newspaper or cardboard inside your pillow cover.
Step 2: Spray the back of the large stencil with spray adhesive and lay it on the pillow.
Step3: Roll on the fabric paint and remove the stencil while still wet.
Step 4: After it is dry (get out the hair dryer if you are impatient like me!), repeat the steps with the smaller stencil in a contrasting color. Done!
The girls needed a new pillow for their bed and I think the chandelier design is super cute.
Check out more of ILTC’s Tulip For Your Home products on their various spots around the web!
These are the supplies I used:
Materials:
- 1 large stencil
- 1 small stencil
- 2 colors of fabric paint
- Foam roller
- Spray adhesive
- Pillow cover
Step 1: Put newspaper or cardboard inside your pillow cover.
Step 2: Spray the back of the large stencil with spray adhesive and lay it on the pillow.
Step3: Roll on the fabric paint and remove the stencil while still wet.
Step 4: After it is dry (get out the hair dryer if you are impatient like me!), repeat the steps with the smaller stencil in a contrasting color. Done!
The girls needed a new pillow for their bed and I think the chandelier design is super cute.
Check out more of ILTC’s Tulip For Your Home products on their various spots around the web!
This was a sponsored post, but opinions are always my own!
Check out some other fun stenciled pillows below!
Tuesday, April 22, 2014
I am a member of the Collective Bias® Social Fabric® Community. This shop has been compensated as part of a social shopper amplification for #CollectiveBias and its advertiser. #WalgreensOlogy
Is anyone in the mood for spring cleaning? I recently took a look at my cleaning supplies and tried to weed out anything harmful. I feel like now that I have kids, it's my social responsibility to keep my home chemical free for the most part! I've compiled a list of very basic things to keep my house in tip top shape using more kid friendly ingredients.
In addition to my homemade cleaning supplies, I found some new all purpose cleaner from Walgreens with no harmful chemicals. I thought I'd give it a try since Reid isn't a fan of my homemade all purpose cleaner.
There is actually an entire line of products by Ology which I'm excited to try!
Anyway...back to the checklist! I like to keep my cleaning products all in one spot. I found this basket at the dollar store.
I also like to just keep a few items and not be overwhelmed with tons of different cleaners for specific jobs. I love ones that will clean multiple surfaces!
This is what is in my basket:
1. Microfiber cloth - works much better than a regular cloth in picking up dirt. Use for windows, counters, wooden surfaces, electronics...anything!
2. Microfiber dusting mitt - I love this little thing because my girls think it's fun to use. I can quickly dust without using any dusting spray. Just wipe down any surface that needs dusting!
3. Rubber gloves - I find I do a much more thorough job as long as I'm wearing gloves. I found these cute ones at Marshalls.
4. Baking Soda - This stuff cleans anything. I sprinkle it on sinks or counters for an abrasive cleaner.
5. All Purpose cleaner - Either make your own or buy a bottle that is chemical free!
6. Vinegar and Water - Use for windows, wood floors, bathrooms...really anything! Add some essential oil if you can't stand the vinegar smell.
7. Old toothbrush - this is a must for getting in those hard to reach spots!
Want more ideas for DIY cleaners? Check out all of my recipes!
Homemade Cleaning Wipes
All Natural All Purpose Cleaner
Homemade Wood Floor Cleaner
All Natural Fabric Softener
Liquid Laundry Detergent
Homemade Foaming Soap
Grout Cleaner
Is anyone in the mood for spring cleaning? I recently took a look at my cleaning supplies and tried to weed out anything harmful. I feel like now that I have kids, it's my social responsibility to keep my home chemical free for the most part! I've compiled a list of very basic things to keep my house in tip top shape using more kid friendly ingredients.
In addition to my homemade cleaning supplies, I found some new all purpose cleaner from Walgreens with no harmful chemicals. I thought I'd give it a try since Reid isn't a fan of my homemade all purpose cleaner.
There is actually an entire line of products by Ology which I'm excited to try!
Anyway...back to the checklist! I like to keep my cleaning products all in one spot. I found this basket at the dollar store.
I also like to just keep a few items and not be overwhelmed with tons of different cleaners for specific jobs. I love ones that will clean multiple surfaces!
This is what is in my basket:
1. Microfiber cloth - works much better than a regular cloth in picking up dirt. Use for windows, counters, wooden surfaces, electronics...anything!
2. Microfiber dusting mitt - I love this little thing because my girls think it's fun to use. I can quickly dust without using any dusting spray. Just wipe down any surface that needs dusting!
3. Rubber gloves - I find I do a much more thorough job as long as I'm wearing gloves. I found these cute ones at Marshalls.
4. Baking Soda - This stuff cleans anything. I sprinkle it on sinks or counters for an abrasive cleaner.
5. All Purpose cleaner - Either make your own or buy a bottle that is chemical free!
6. Vinegar and Water - Use for windows, wood floors, bathrooms...really anything! Add some essential oil if you can't stand the vinegar smell.
7. Old toothbrush - this is a must for getting in those hard to reach spots!
Want more ideas for DIY cleaners? Check out all of my recipes!
Homemade Cleaning Wipes
All Natural All Purpose Cleaner
Homemade Wood Floor Cleaner
All Natural Fabric Softener
Liquid Laundry Detergent
Homemade Foaming Soap
Grout Cleaner
Subscribe to:
Posts
(
Atom
)